
The Importance of Adhesion

Obvious adhesion issues
Achieving 100% adhesion with a coating system plays a crucial role in delivering ideal results. The coating system’s entire performance depends heavily on its adhesion. When adhesion to the substrate or between layers (inter-coat adhesion) falls short of 100%, the coating often performs poorly. Peeling commonly signals adhesion failure, but poor adhesion also reduces the coating’s chemical resistance. Many coatings rely on full adhesion to achieve optimal chemical resistance and performance.

Adhesion failure - blistering
Formulate coatings within a system to adhere to each other and to the substrate. Most coatings include a recoat window that lets the next coat stick to the previous one without extra preparation. Poor inter-coat adhesion causes coating failure. Always refer to technical data sheets (TDSs) to prevent adhesion issues. If you apply coatings outside the recoat window, you must perform mechanical or chemical preparation to ensure full adhesion.

Coating manufacturers formulate coatings within a system to adhere to each other and the substrate. Most coatings include a recoat window that allows the next coat to stick to the previous coat without extra preparation. Poor inter-coat adhesion causes coating failure. You must refer to technical data sheets (TDSs) to avoid adhesion problems. Applying coatings outside the stated recoat windows requires mechanical or chemical preparation to ensure full adhesion.
Coatings fail to adhere when they do not cure properly. Epoxy coatings often experience amine bloom and amine blush when applicators apply them outside the recommended environmental parameters, such as high humidity or high dew point. If the first coat looks hazy or dull and hasn’t cured or dried properly, contact your manufacturer’s representative before applying the next coat.
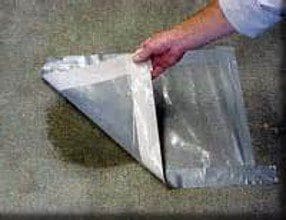
Before starting a coating project, test the concrete for moisture. Moisture in a concrete slab causes adhesion problems later if you don’t use the proper system to treat or accommodate it. Several visible signs may indicate excessive moisture, but you can only confirm by performing a moisture test. A simple plastic sheet test (see right photos) reveals if a slab has an alarming moisture level.

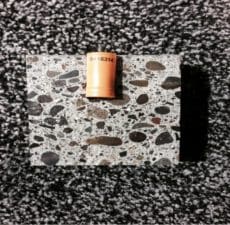
However, more scientific tests such as calcium chloride (see bottom right photo) or in situ probe testing (see bottom left photo) will yield a “moisture number” such as the number of pounds per 1000 SF / 24 hours or the relative humidity of the slab. These readings can then be used to select the best product or system.

After you select the coating system, follow the manufacturer’s recommended preparation procedures to ensure 100% adhesion. Start creating the proper concrete surface profile (CSP) by referring to the coating’s TDS. The TDS includes the recommended preparation steps. Lack of proper preparation causes most coating failures (https://ultradt.com/why-coatings-fail/). People say a coating is only as good as the floor or substrate it covers.
After preparing the surface, clean it thoroughly. Sweep, vacuum, scrub, degrease, or use other methods as needed. Remove grease, oils, dust, and contaminants before applying the coating. Achieving a properly profiled and clean surface directly impacts adhesion and product performance.
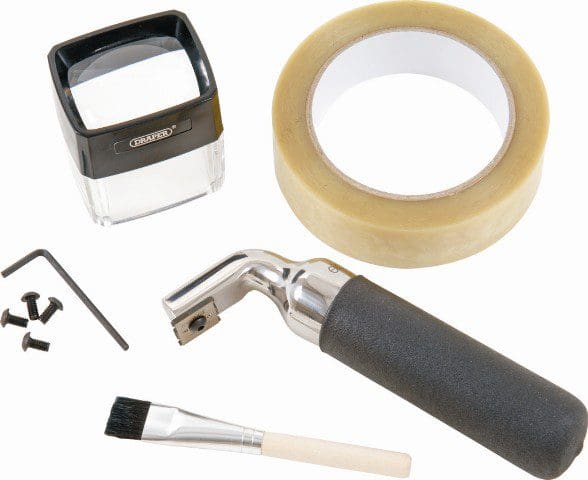
You can test adhesion using multiple methods. A relatively cheap and easy method is the cross-hatch test (see photo below). This method involves cutting a grid through the coating with a sharp knife, razor blade, or cross-hatch tester. Then, you abrade the checkerboard grid with a very-fine maroon conditioning pad and clean the surface. After it dries, apply adhesion tape to the grid and pull it off. If the tape distorts any lines or removes full squares, the adhesion is not 100%. Some cross-hatch testers create 100 squares.

The number of squares remaining after the pulling of the tape is recorded as the percentage of adhesion. For example, if 85 squares remain (or 15 pulled off with the tape), the adhesion of the coating or system is roughly 85%.
You record the number of squares remaining after pulling off the tape as the percentage of adhesion. For example, if 85 squares remain (or 15 pull off with the tape), the coating or system’s adhesion measures roughly 85%.
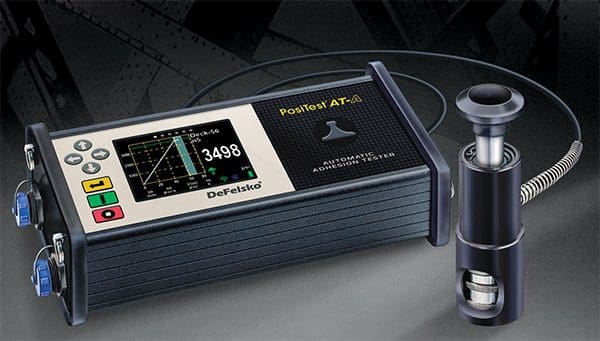
Another adhesion testing method uses an automatic adhesion tester (see right photo). You glue little pawn-type pieces called dollies to the coating and let them dry or cure for 24 hours. Once cured, you attach a device to the dolly and apply air pressure to slowly pull the dolly upward. The device provides a PSI reading when the dolly pops off. Then, you inspect the floor surface and the bottom of the dolly to determine if failure occurs from concrete failure or inter-coat adhesion issues within or between the coats applied.

Rectifying adhesion issues often costs a lot. To fully resolve peeling problems, we recommend completely removing the entire system using chemical removers, grinders, or shot blasting equipment. Sometimes, coating failures occur only in areas with contamination or where installers made preparation mistakes or shortcuts. You can perform spot patches or fixes by removing the failing product until the peeling or flaking stops. Usually, patches or repairs remain visible after completion. However, a skilled contractor can hide patches by blending them in or using expansion joints or floor seams as start/stop points for repairs.
In conclusion, contractors should carefully read a product’s TDS and ask the manufacturer many questions before starting. They must follow preparation, mixing, and application instructions precisely to ensure success and satisfy the customer.
Travis Negaard
CEO – Ultra Durable Technologies